Green Thinking
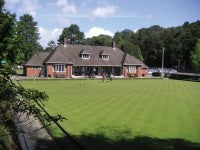 Renovations are an indispensable part of an annual maintenance plan for any bowling green. In order to sustain playing quality on your green throughout the playing season it is important to:
• Maintain organic matter within acceptable parameters
• Encourage and maximise root depth
• Ensure the rootzone is well aerated
• Provide adequate drainage away from the surface and through the soil profile
• Encourage and ensure an adequately dense cover of finer grasses
Organic matter is one of the most influential and common of soil profile limitations, although other issues can also lie beneath the surface that requires attention. The type and nature of renovation we carry out should very much be targeted at each green's specific problem. Where your renovations continually fail to address your green's agronomic issues we can expect:
• Softer and slower playing surfaces
• Increased surface water retention after rain events
• Increased disease and pest occurrence
• Increased presence of undesirable weeds and grasses
A combination of all the above consequences may lead to less bowls being played on the green, increased maintenance costs and unhappy bowlers and members.The majority of clubs now renovate at least once, if not twice, a year aiming to reduce organic matter accumulations and associated soil profile problems such as:
|
|
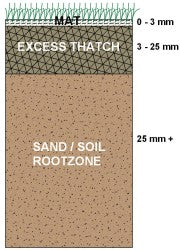
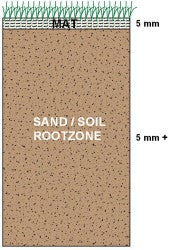
Mat Layer: A layer of newly accumulated vegetative matter, usually dead leaf and crown matter, that builds up within the surface (0-5 mm). Where present in excess amounts this contributes to disease occurrence and a 'squelchy' surface after rain.
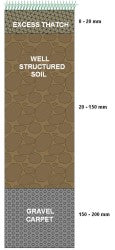
Thatch: A layer of dead and decomposing plant material consisting of leaf, crown, stolons and/or rhizomes and roots, which can be several centimetres thick. When excessive, greens will be prone to soft, wet, slow and disease susceptible surfaces.
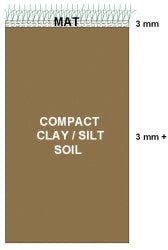
Compact soil: Clay and silt dominated soils are particularly prone. Compaction restricts air movement into the soil, water movement through the soil and root development. As a consequence such greens are more prone to stress and are usually dominated by shallow rooting grasses such as Poa annua.
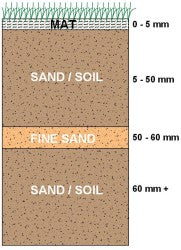
Layered soil types: Can consist or two or more distinct thin (5-30 mm) layers of different types of top dressing that haven't been incorporated into one another. This often occurs on older bowling greens that have been topdressed with quite different materials over the years.
 Your green could have any one, or a combination, of these limitations within the soil profile. More often than not, though, it is excessive thatch. Carrying out the same renovation as last year, or using the machinery most conveniently available to you, might not properly address the issues specific to your green. You can, therefore, expect the problems to continue to some extent to affect the quality of the bowling surface.
New and more job specific renovation machinery has entered the market, and greenkeepers now have an abundance of renovation machinery to choose from. The question is, which renovation tool will help address your renovation requirements most effectively?
Renovation Machinery
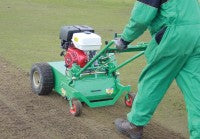
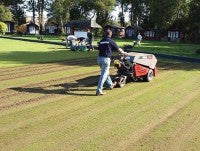
Scarifiers/verticutters: Pedestrian or mounted on smaller powered units, these devices are designed to lift organic litter from the mat layer that builds up in the surface.
Heavy duty scarifiers: Mounted on bigger pedestrian or tractor units, these devices are designed to lift organic litter from within the thatch layer to depth of 25-30mm.
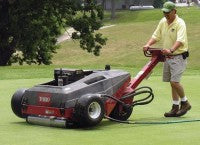
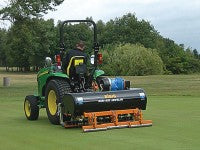
Hollow/solid corers: Pedestrian or tractor mounted units, these are designed to remove and/or punch holes through the thatch and soil to depths of 6-65mm.
Aeration Machinery
|
|
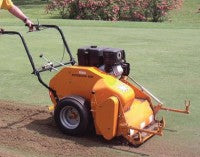
Vertical heave-action aerators: Pedestrian or tractor mounted units, these are designed to punch holes and, if required, 'kickback or heave' to fracture the underlying soil and create new channels for air, water and roots. These can also be used as hollow tine corers to depth (100mm or more), if required.
HydroJect: Pedestrian units, these are designed to punch holes into the soil profile and 'blast' water into the soil profile creating new channels within the soil.
Air injectors: Pedestrian or tractor mounted units, these are designed to punch holes into the soil profile and 'blast' air at high pressure into the soil profile creating new channels within the soil.
You will note in the machinery descriptions, each tool is designed to address very particular issues within the soil profile. Finding out what are the limiting factors in your green's soil profile is the first and most fundamental step to deciding what you must do for your renovation.
Here are some common examples of soil profile limitations observed during visits to bowling greens, and the renovation requirements necessary to address them.
|
DIAGRAM 1 Mat layer, excess thatch and free draining soil: The problems: • Increased disease occurrence • More surface water retention • Soft slow playing surface The renovation: • Scarify 3mm deep, 1-2mm blades, 10-12mm apart • Hollow core with 14-16mm tines, 50mm x 50mm spacings to 30-35mm deep • Topdress, allow material to dry and work into core holes |
|
|
DIAGRAM 2
Mat layer, good rootzone but with fine sand layer The problems: • Increased disease occurrence from mat layer. Fine sand layer causing 'root break' encouraging shallow rooting plants • Shallow rooting plant more prone to drought stress. Possibly unstable ground underfoot The renovation: • Scarify 5mm deep, 1-2mm blades, 10-12mm apart • Solid tine core with 16mm tines, 50mm x 50mm spacings to 65-70mm deep. Or combine shallower hollow tine coring and solid tining to at least the depth of the fine sand layer • Topdress, allow material to dry and work into the surface |
|
|
DIAGRAM 3
Mat, good rootzone The problems: • Increased disease occurrence from mat layer The renovation: • Scarify 3mm deep, 1-2mm blades, 10-12mm apart • Topdress, allow material to dry and work into core holes |
|
|
DIAGRAM 4 Mat, compacted clay/silt soil The problems: • Increased disease occurrence from mat layer • Poor water movement through soil causing poor drainage in winter and dry patch in summer • Compact soil encourages shallow rooting plants more prone to stress and thatch accumulation The renovation: • Scarify 3mm deep, 1-2mm blades, 10-12mm apart • Solid tine core with 16mm tines, 50mm x 50mm spacings to 40-50mm deep • Top dress, allow material to dry • Verti-Drain 16mm tine closest spacing 150mm deep • Work topdressing material into core holes |
|
|
DIAGRAM 5 Excess thatch, good soil and gravel drainage layer The problems: • Increased disease occurrence • Increased surface water retention The renovation: • Solid tine with 10-12mm tines closest spacing, preferably into the drainage gravel blanket (no heave) • Topdress, allow material to dry and work into core holes |
|
With any given soil profile, there can be a number of potential or current limitations that present both short and long-term maintenance issues. The type of machinery required to address each problem varies, so choosing the correct type of machinery and employing appropriate spacing and depth is crucial.
Working in topdressing material
Generally, the use of dragmats as the only means to work topdressing into the surface of a flat bowling green is not encouraged. Initially, the use of a straight edge/level bar is preferred. Whilst being dragged over the green the straight edge moves topdressing material into low spots, thus improving levels on the green.
Where getting topdressing material into large core holes, following hollow/solid tine coring, is a priority, as with some of the examples shown within this article, the use of a dragmat or brush will allow you to get more topdressing material into the core holes and, in such a case, is acceptable. Only using a dragmat will improve surface smoothness not surface levels.
When trying to get topdressing material into core holes to create clean columns of desirable topdressing material, ensure:
• Large core holes are made using 12-16mm tines, smaller core holes will limit material getting into the core holes
• As much as practical, carry out the renovation when ground conditions are dry
• Only use dry topdressing and, ideally, leave this on the dry surface for a few hours to dry even further. Dry sand/soil will be much easier to move into core holes
• Don't leave core holes open to 'aerate' for longer than a day, the grass may start to grow over the core holes making it much harder to get topdressing material down the hole
• Use an appropriate quantity of sandy topdressing material - usually 2-3m³ is recommended over a green. When attempting to fill hollow core holes, at least 3.5-5 tonnes will be required
Take care when covering the turf with large quantities of topdressing material in any autumn treatments, and certainly do not smother the surface. It may be better to split a very heavy dressing into two treatments, allowing several days between treatments. What is important when topdressing is that decent growth is taking place, so that the grass grows through the dressing quite quickly. Topdressing lying on the surface for any length of time invariably increases the risk of disease activity.
Verti-Draining and air or water injecting (aeration)
Such practices are traditionally used during the autumn renovation. It is worth noting that the impact such practices have on the soil structure is strongly influenced by the soil moisture at the time of use.
Using this machinery whilst the soil is saturated is likely to have limited benefit, as tines are likely to 'slide' through the soil. In contrast, if carried out whilst the soil conditions are drier, the tines or compressed air are likely to fracture the soil, creating new channels for air, water and roots.
In summary, before booking in your Verti-Drain or air and water-injecting machine this autumn, try and judge when the best soil conditions will present themselves and the playing schedule allows. This might not always be during the autumn renovation.
Overseeding at renovations
Much debate goes on as to the best overseeding practices. This is mainly attributed to some people's limited understanding of just how successful overseeding can be.
However, as we increasingly strive to encourage finer grasses, so does our understanding of overseeding. Here are some commonly asked questions;
Should I overseed regardless of the condition of my green?
The objective of oversowing is to ensure the seed matures into a strong and healthy mature plant. This is significantly harder to achieve than just getting the seed to germinate. It is the experience of many greenkeepers that overseeding finer grasses into poor draining and excessively thatchy greens, achieves little or no long-term benefit. On the other hand, overseeding thatchy and poor draining greens is not always a complete waste of time; it's just going to significantly reduce the percentage of seed that develops into mature plants.
It is my view that more benefit will be obtained from addressing the main issues of thatch and drainage before overseeding with bentgrasses and fescues.
Bentgrass, fescues or both?
Generally, most clubs overseed using a mixture of fine fescues and bentgrasses. This is a safe recommendation as, if done correctly, the two species will hopefully find a good balance in their long-term survival. However, in drier situations the fescue may dominate
If you are dealing with a wetter, thatchy Poa annua dominated green, getting fine grasses, particularly fescues, to thrive in this environment will be very hard. In this instance, as well as addressing the thatch it may be better to encourage bentgrasses alone. Establishing fine fescues into such an environment will have limited success and could be considered as money down the drain.
Spring or autumn renovation overseeding?
Of the two, autumn overseeding is likely to be more successful as this gives the plant a full winter to develop free from wear, as well as heat and drought stress.
Spring seeding isn't a complete waste of time but is likely to be significantly less successful in establishing mature plants.
What rate?
Remember, fescue seed and bentgrass seed are significantly different in size and have very different individual seeding rates. A good piece of advice is to refer to the supplier's recommendations, but as a guideline:
- Bentgrass: 4-6 g/m²
- Fine Fescues: 30 g/m²
- Mixture: 35 g/m²
for overseeding significantly weak or bare ground.
How to best incorporate the seed into my renovation?
The key objective with any overseeding is to achieve maximum seed to soil contact, without smothering the seed. If using pure bent or fescue for overseeding (and not a ready made mixture), the methodology for achieving this is different.
Fescue seed is much bigger and best introduced a little deeper (say 6-8mm), to enable good seed to soil contact. To achieve this, holes or grooves in the surface will have had to be made prior to seeding. This could be core holes or deep scarification grooves from renovations. Alternatively a dimple or other dedicated seeder could be run over the green. Seeding of fine fescues will be more successful when undertaken prior to topdressing.
Where using bentgrasses alone, the seed must not be buried deeply. Overseeding can form part of the topdressing aspect of renovation programmes, either before light (2-3m³) topdressing applications or after if applying heavy topdressing applications (3.5-5 tonnes). In both cases the seed and material will require working together into the surface via a level bar or dragmat as discussed.
When seeding mixtures of fine fescues and bentgrasses it will again be a priority to accommodate the seed by forming shallow holes/grooves for the seed to work into, finishing off the process with topdressing.
Summary
• Assess your green and its specific problems
• Provide tailor made solutions to your requirements
• Employ appropriate machinery and materials
• Complete in good time whilst dry conditions and good growth is taking place.
About the author: Charles Henderson, originally from East Yorkshire, has spent the last four years working as a Sports Turf Agronomist for the New Zealand Sports Turf Institute (NZSTI) throughout the northern North Island.
