What we did on our holidays ...
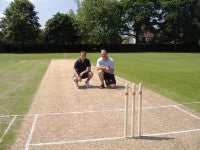 In July 2010, on the last day of the summer term, we started renovation work on one of our cricket squares - it was to be renovated in two stages. The first stage was to add two additional wickets (10ft wide) to either end of the square.
We are a prep school, but ten day pitch preparations are carried out to a high club/county standard. The longest wicket being prepared at any one time is 20 yards for U11s, then 19 yards for U10s - 18 yards for U9s and so on. Our squares are always renovated and maintained to full length, so 21 and 22 yard pitches can be prepared if and when required.
This square is ninety years old and flat as a pancake, with no saddles! The outfield is a little bumpy in places, but that's also work in progress. A decision had to be made how far down to excavate the already clay-loamy rootzone. Was it necessary and worth the expense of removing the top 100mm or so for two wickets either end of the square? If so, why not dig everything up?
Core samples from the existing square, informed us that clay content and root structure were at a good density with no visible root breaks. There were signs of a pan 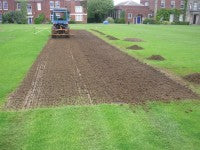 but, with our ongoing winter aeration programme, there were clear, healthy roots breaking through. Plus, there was the school's busy fixture list to consider for next season, so I was confident that we made the right decision.
We, meaning myself and our assistant groundsman, Danny Luton, who has been working alongside me for the past ten years. I feel it's important that we get the right people involved, including our school bursar, who is always keen to see how we spend the budget and make sure we get it right - or wrong - but learn from it. Subsequent to confusing ourselves after a lot of thought (ten minutes), we decided to work with what we had got.
The first job was to re-measure and square off the cricket square. Then, with our pitch marker, a 2" line was marked out around the whole of the square (like a box), then 10ft wide marks put in either end and, again, marked out with a 2" line to join up with the rest of the square. This made work on the new tracks easier to identify without disturbing the other pitches, which were to be renovated in the next stage. Three bags of Bar Extreme grass seed and seven 1 tonne bulk bags of Kaloam were ordered.
On the last day of term, when everyone had left by midday, Danny skillfully sprayed the two strips with glyphosate using a knapsack with a spray shield. The area was left for ten days, then the whole square was scarified with our tungsten tipped bladed cassette fitted to the Dennis FT mower. A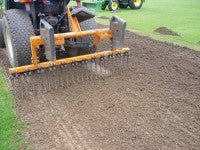 ny dead thatch and fibres were removed with a rotary mower, and then our Wessex tractor powered brush was run over the surface, with the aid of a blower, to clean up any remaining debris.
The next job was to flood the whole area. Then, a combination of watering and spiking to aid water to penetrate the surface in readiness for the next stage - very importantly, by working with moisture levels, we got the soil conditions correct to maximise the full benefit from our equipment.
We used our sisis spring tined rake - with spring coils facing away from the rear of the tractor, and tractor weights fitted to the frame - to gain extra down force. We have found this more aggressive approach very affective when tithing the surface prior to reseeding and topdressing our winter pitches - although it had never been tried on the cricket squares before!
After raking the wicket in different directions in four passes, with the final pass down the wicket, we tilthed the surface to 10mm. This was removed with rakes, repeated and a further 10mm removed. We were surprised at the soil quality.
The verti-drain came out at this point and hollow tined, down to about 70mm, the two strips as much as possible. We then applied Kaloam to fill holes, and luted in. A final tilth raking down to 10mm was performed to form a key and 30mm of Kaloam was applied, trodden in and raked repeatedly until the final levels were achieved, just being slightly proud to allow for any settlement over the winter. A Scotts 8:12:8 pre-seed fertiliser was applied, then one track was seeded with Bar Extreme at 35g per m2 and the other with a mix of Bar Extreme and Bar Platinum.
In the first week of August, both strips were covered with germination sheets and watered by hand with a rose lance, on a little and often approach. Germination was thick and fast, with new seedlings popping through after four days - the sheets were removed after seven days. After the second leaf stage, we wer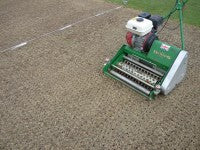 e cutting regularly with a sharp bladed rotary mower.
Although not a text book approach to creating additional wickets from scratch, with time, patience and experience on our side it was done to a budget, with all equipment and work carried out in house with just seed and loam required. Cost? £300. The plan now is to hollow core down to 100mm, once this season has finished, and topdress ready for play next season.
With the new wickets coming on nicely, our attention now turned to preparing for renovation to the rest of the square. All through August, the whole square was watered regularly and sarrel spiked to allow the elements to do their work.
The second week in September saw conditions that were perfect, and the square was scarified down to 6mm in three directions, again with the tungsten tipped Dennis cassette. Debris was cleaned up with the rotary, then we verti-drained down to 100mm with 1/2" tines. The surface was then cleaned up again, with the Wessex power brush, in readiness for seeding.
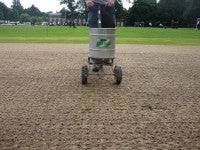
We have a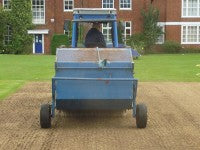 lways favoured dimple seeders, because of the little and often approach. We normally use a pro-seeder or the sisis Variseeder but, this time, we decided keep the tractor off the square after verti-draining to avoid any wheel marks, and used the sarrel roller cassette on our Dennis FT. Conditions had to be just right so, with time on our side, there was no rush. The sarrel was put across the square in three directions, leaving nice clean pods for the seeds to drop into. Scotts 8:12:8 pre-seed fertiliser was applied at 35g per m2. Bar Extreme seed was spread with a cyclone spreader in two directions at 35g m2. The seed was then brushed in with an up, down and across motion with the drag brush until all the seed pods were hidden, and then the whole process was repeated one more time.
 Once we were satisfied, we topdressed by hand, one track at a time, and carefully worked the Kaloam into the holes left from the verti-drain with Trulutes. This can be time consuming, but well worth it. Any footmarks and undulations can be addressed as well.
The two new strips were overseeded using the sarrel and seed spreader, and a light dressing of loam was applied with a sisis Truspread, and dragmatted to level off. Finally, the square was roped off and left to recover.
Our other cricket square was autumn renovated in the same way. Core samples taken in February 2011 showed a buried thatch layer. A Graden has already been booked in to help address this at the end of our summer term in July. This will also allow us to reseed our squares. We look forward to the challenge.
Since renovations, there has been concern about our cricket loam availability for the future but, hopefully, this will get resolved and we can carry on improving our surfaces. I could very well be telling a different story now if the continuing supply of Kaloam becomes an issue.
One thing we did learn from all of this was never take anything for granted, work to your strengths and improve on your weaknesses.
